产品中心
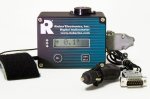
RDS7-BB-09 Digital Ball Banking Indicator
| 介绍: | FeaturesAngle Range: ±30°Audible Alarm: adjustable trip settingsRelative Zero: Auto LevelingAngle Display: Degrees or Percent GradeDisplay Resolution: 0.1°2 Power Options:oCigarette Lighter Adaptor Ca… |
|---|

Features
Angle Range: ±30°
![]()
Audible Alarm: adjustable trip settings
![]()
Relative Zero: Auto Leveling
![]()
Angle Display: Degrees or Percent Grade
![]()
Display Resolution: 0.1°
![]()
2 Power Options:
![]()
o Cigarette Lighter Adaptor Cable/Plug
o 8-30VDC input supply ready
Velcro Mounting: Quick Installation and
![]()
Easy Removal
Min/Max Reading: freezes the highest Left and Right corner readings
![]()
RS232 Serial Output: connects directly to your PC laptop
Description: The RDS7_BB model was specifically designed for determining safe curve speed of horizontal curves and road signing without the need for a passenger or observer. The standard digital ball banking unit has a single line LCD display showing angle or slope in degrees. It has a built-in buzzer that is set to alarm at ±10° of angle, which is the limiting angle used by most traffic engineers in the US - however please verify this with your state DOT.
The display has 3 built-in LEDs (GREEN, YELLOW, RED), only the GREEN and RED are activated for this unit. The Green LED will light when the angle is within the ±10º range, the Red LED indicates when under or over the limiting angle (>±10º). Note: this angle can be adjusted if required by your DOT (either at the factory or by the operator with the adjustable trip angle option).
As you drive through a curve, the microprocessor records the largest positive and negative angles measured since the last reset. The most negative angle is recorded as a left turn and the most positive angle is recorded as a right turn, which would allow the operator to drive an S curve in one sweep. Once the driver has finished going through a curve, the driver presses the MIN/MAX button once - the left angle is displayed - driver presses the button again - the Right angle is displayed - driver presses the button a third time to reset the display.
Mounting: The RDS7-BB can be mounted on any surface that is within 10 degrees of level. To determine if the surface is within the appropriate level, power up the unit and place it on the desired location. If the unit displays less than 10 degrees then the chosen location is fine. Once the mounting location has been determined, wipe the surface clean with a cleanser such as Windex and then apply one of the supplied strips of Velcro. Apply the remaining strip of Velcro to the bottom of the unit. The RDS7-BB is ready to attach to the vehicle’s surface. With the vehicle on a relatively level surface, power up the unit and look at the digital display to determine if the unit is reading 0 degrees or level. If the selected mounting location is level the unit is ready to begin ball bank operation.
![]()
![]()
![]()
![]()
![]()
![]()
![]()
![]()
![]()
![]()
Power Supply: The RDS7-BB has two power options - standard 12 Volt cigarette lighter style cable connection or 8-30VDC non-regulated input via the DSUB15 connector if the vehicle does not have a standard cigarette lighter socket.
Auto Leveling (RELATIVE ZERO): If the unit is not level, but within ±10 degrees, press and release the REL button. The display will read “REL ON” for one second then revert to normal with the unit reading zero. If after pressing the REL button and the display reads “OVER RANGE” the unit is not within ±10 degrees from level. The operator must re-position the unit then repeat auto leveling. When the unit is in REL mode you will see the (*) symbol displayed indicating that the relative zero (REL) function is active. Please remember that the unit should be auto leveled using the REL button while the vehicle is on a flat surface. Auto leveling with the REL button must be performed whenever the unit has been powered off.
Operation: Once the RDS7-BB unit has been auto leveled, the operator is ready to go to work. Before driving the stretch of road with the curve that will be evaluated, press the MIN/MAX button slowly three (3) times: The first press will display “LEFT” for one second, then freeze the (-) side reading. The second press will display “RIGHT” for one second, then freeze the (+) side reading. The third press of the MIN/MAX button will display “RESET”, then immediately go back to normal function.
When in the act of determining safe curve speed, the MINIMUM reading corresponds to left hand turns and the MAXIMUM corresponds to right hand turns. The RDS7-BB unit comes factory set to sound an alarm at ±10 degrees, allowing the operator to safely drive through the corner - eyes on the road, not the unit. If the system determines the vehicle has exceeded ±10 degrees, it will sound an alarm, which indicates to the operator to press the MIN/MAX button to display the highest value achieved – providing the necessary information to determine the safe speed for that curve.
RS232 Output: If a laptop computer will be used in conjunction with the RDS7-BB, the appropriate
Rieker power cord will be needed to provide RS232 output. This modified power cord splits to provide a serial port connector as well as the cigarette lighter adaptor.
To install: First, insert the cable’s single-end serial connector into the RDS7-BB’s serial port then attach the computer serial port connector to the laptop’s serial port. Finally, insert the cigarette lighter adaptor end into the cigarette lighter socket of the vehicle – the unit and computer can now be switched on.
When power is supplied to the unit data will begin to flow to the laptop. The data is recorded by a program called HyperTerminal, which is available on PCs running Windows (95, 98, 2000, XP). A single column of numbers will appear on the screen with a (+) or (-) sign to distinguish between a left or right turn. The output provides a continuous stream of readings - one reading per line at approximately 250mSec per reading. The unit is configured for 9600 baud, 8 data bits, no parity, 1 stop bit.
Pressing the MIN/MAX button will stop the flow of data from the RDS7-BB. We recommend you press the MIN/MAX two (2) times in order to display the “MAX” reading, specifically so that the unit is not outputting data to the computer. When driving and ready to start recording data press the MIN/MAX button one more time to reset the unit and it will resume sending data. Once you have completed the course that you want to record press the MIN/MAX button again to stop the flow of data.
Over Range: The RDS7-BB has a total range of 60 degrees (±30°). When this range is exceeded the display will read “OVER RANGE”. While this will probably not occur during normal use it can occur when mounting the unit or when using the REL button for auto leveling. If you are mounting the unit on a surface that is out of level by more than ±10 degrees the display will read “OVER RANGE”. If this occurs, simply re-position the unit to within ±10 degrees of level.
![]()
Power Input/Output Cable Assembly p/n: CBL-DB15-6-G
Supplied with your RDS7-BB-09, for input power supply and Digital Serial RS232 Output.
Features:
Two (2) split cables from one (1) DSUB15 male mating connector:
![]() Cable #1: 6 FOOT BELDEN CABLE # 83556 for power input via cigarette lighter adaptor (CLA) plug.
Cable #1: 6 FOOT BELDEN CABLE # 83556 for power input via cigarette lighter adaptor (CLA) plug. ![]() Cable #2: 6 FOOT BELDEN CABLE # 9967 for RS232 output connects to PC via DSUB-9 female serial port connector. NOTE: for laptops with USB ports only, USB/RS232 converter plug connector required, part number A-USB sold separately.
Cable #2: 6 FOOT BELDEN CABLE # 9967 for RS232 output connects to PC via DSUB-9 female serial port connector. NOTE: for laptops with USB ports only, USB/RS232 converter plug connector required, part number A-USB sold separately.
![]()
![]()
![]()
![]()
![]()
![]()
![]()
![]()
![]()
CABLE WIRING TABLE
CONNECTOR | DESCRIPTION | WIRE | TERMINATION | ||||||||||
DSUB15 | CABLE #1: 6-FT, POWER INPUT | COLOR | CLA PLUG | ||||||||||
PIN 2 | INPUT POWER (+8 TO 30VDC) | WHITE | CENTER TAP | ||||||||||
PIN 3 | POWER/SIGNAL/SWITCH COMMON | BLACK | OUTER TABS | ||||||||||
CABLE #2: 6-FT, RS232 OUTPUT | COLOR | DSUB-9 | |||||||||||
PIN 9 | RXD | WHITE | PIN 3 | ||||||||||
PIN 10 | TXD | RED | PIN 2 | ||||||||||
PIN 11 | RS232 COMMON | BLACK | PIN 5 | ||||||||||
![]()
![]()
![]()
![]()
![]()
![]()
![]()
![]()
![]()
![]()
![]()
![]()
![]()